Make & Do – PIR sensor Arrives

WP_20131031_009

My PIR sensor arrived in the post from Scotland but it arrived without any instructions or information. So I had to do some research to try and locate some information on how to use it. I read the code on my PIR sensor and it read DYP-ME003. So I searched Google for information on this type of PIR and to my relief, I found this page:

http://www.elecfreaks.com/wiki/index.php?title=PIR_Motion_Sensor_Module:DYP-ME003#Schematic

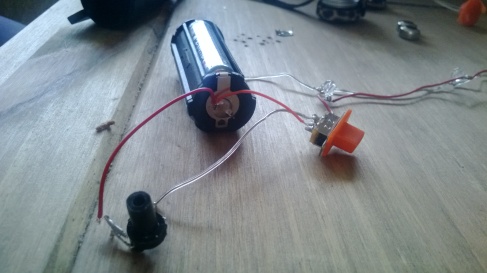
This provided me with a description of how the sensor works, its components and a schematic. I was happy to see that the minimum input voltage needed to be 3.5V because my batteries amount to 4.5V.  The instructions suggest using a red LED to test the sensors functionality – I found 2 red LEDs in a keyring. I connected the positive and negative wires  from the sensor to the 4.5V battery box from a Halloween toy I found (I found a Halloween toy with a suitable sound module that I plan to use – I’ll talk about this in my next post) . I connected the LEDs and the switch from the keyring using this diagram from the instructions. I didn’t use a resistor but it worked OK – I’m sure if I left it for much longer I would have burned out my LEDs again.

Image

I will post up the Video next…..

Research & Development

I’ve been doing some research into some existing “hair dressing” games available to play for free on the internet and I’ve come up with some ideas for features I could add to my game in order to make it more difficult to play or more interactive:

  • I could include a row of customers lining up behind the current customer so that the user can anticipate what is coming next. However these customers will be waiting for the user to finish and will be very impatient – so the user will have to get though their current customer quick enough before the next customer loses patience and walks out – this scenario will incur the loss of a score. I could show the customers level of anger by the colors of their face: the redder the face, the closer the customer is to walking out of the salon.

High Specification – 1st Draft

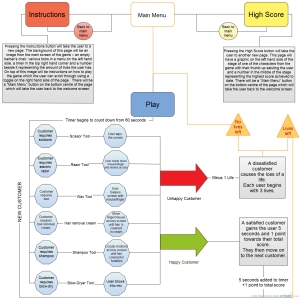
When the programme is run initially the user will be presented with a welcome screen – this scene will consist of some of the characters in the game waving at the user while they’re lining up on the street outside the barber shop. There will be a menu here with 3 buttons: Instructions, High Score, and Play.

Pressing the Instructions button will take the user to a new page. The background of this page will be an image from the main screen of the game – an empty barber’s chair, various tools in a menu on the left hand side, a timer in the top right hand corner and a number beside it representing the amount of lives the user has. On top of this image will be instructions on how to play the game which the user can scroll through using a toggle on the right hand side of the page. The text for these instructions will be black and the opacity of the image underneath will be at around 70% so that the text is readable. There will be a “Main Menu” button on the bottom centre of the page which will take the user back to the welcome screen.

Pressing the High Score button will take the user to another new page. This page will have a graphic on the left hand side of the stage of one of the characters from the game with their thumb up saluting the user and a number in the middle of the stage representing the highest score achieved to date. There will be a “Main Menu” button on the bottom centre of the page which will take the user back to the welcome screen.

Pressing the Play button will take the user into the game.  The user will see a large timer in the centre of the screen count down from 5 to 0 and then the game will begin. The timer on the top right hand corner will begin to count down from 60 and one customer will appear on the barber seat in the middle of the stage. There will be a shop bell sound every time a new customer appears on-screen. Each customer will have a different amount of hair on his/her head. The amount will vary per customer – ranging from little hair to medium and large amounts of hair. The method by which the user must remove the hair for each customer will be hinted within a thought bubble coming from the customer’s head. The user must then choose the appropriate tool for carrying out the job correctly.

There will be a tool-bar down the left hand side of the stage. This tool bar will consist of 6 options: scissors, electric razor, wax, hair removal cream, shampoo and blow-dry. The user must use these tools correctly in order to satisfy the customer. The correct actions for each of these tools will be as follows:

Scissors:  Tapping the screen, or clicking the mouse in multiple places to eliminate the hair. Using this tool will trigger a “snipping” sound clip.

Electric Razor: Touching/clicking and holding while moving your finger/mouse across the hair until it is all gone. Using this tool will trigger a “buzzing” sound clip.

Wax: Swiping your finger/mouse across the screen. Using this tool will trigger a “ripping” sound clip.

Hair Removal Cream: Clicking/touching and holding your mouse/finger on the hair and moving it across the hair until it is all covered in cream. Wait 3 seconds for the hair to disappear. Using this sound will trigger a “slimy” sound clip and a countdown sound clip as the 3 seconds counts back.

Shampoo: Vigorously moving your finger/mouse in circular motions across the screen until the hair is covered in bubbles. Using this tool will trigger a “bubbling” sound clip.

Blow-Dry: Blowing into the microphone. Using this sound will trigger a hair dryer sound clip.

Using the right tool correctly and within the time limit will remove all of the hair and result in a reward of 5 extra seconds on the timer and 1 point towards the user’s score. The next customer will then appear on screen.

The next customer will be chosen randomly, as will the amount of hair on their head and the method in which they would like it to be removed.

Using the right tool correctly but not quick enough will result in the user running out of time and incurring the loss of 1 life. No points will be scored in this scenario.

Using the right tool incorrectly will result in the user eventually running out of time and ultimately losing a life. No points will be scored in this scenario.

Using the wrong tool will also lead to the user running out of time which will incur the loss of a life. No points will be scored in this scenario.

When a user runs out of lives their game is over and their score is recorded. If their score is higher than the highest score last recorded then the previous score gets replaced by the new high score. This is the score that will be read in the “High Score” section.

The aim of the game for the user is to get through enough customers to beat the highest score.

The Tool Bar: Various hair-removal tools and how to interact with them

Image

I’ve been considering the various ways in which my users will be able to interact with my game. The main elements of interactivity will exist in the different hair-removal tools in the tool-bar. I will have 6 different options on this tool bar: Scissors, Electric Razor, Wax, Hair Removal Cream, Shampoo and Blow-Dryer.  These tools will remove the hair from the customers head but the user must interact with them correctly in order for them to do so. Here is a list of each of the tools and their instructions for using them correctly:

Scissors:  Tapping the screen, or clicking the mouse in multiple places to eliminate the hair.

Electric Razor: Touching/clicking and holding while moving your finger/mouse across the hair until it is all gone.

Wax: Swiping your finger/mouse across the screen.

Hair Removal Cream: Clicking/touching and holding your mouse/finger on the hair and moving it across the hair until it is all covered in cream. Wait 3 seconds for the hair to disappear.

Shampoo: Vigorously moving your finger/mouse in circular motions across the screen until the hair is covered in bubbles.

Blow-Dry: This is a feature which I’m not yet 100% sure about whether or not I can include it in my game but if I can it will work by blowing into the mic.

Make & Do – Prototype #1

Here is my first attempt at a prototype for my interactive pumpkin. I learned a lot about the components that I had collected and as a result I’ve had to make a new shopping list so I’m glad I didn’t leave this prototype much later than I already have. Although the prototype sort-of worked temporarily, unfortunately I didn’t get it working long enough to take a video. However, I did take some photos so I will explain my process using those and will hopefully upload a video in the next few days when I buy what I need and build it again.

Image

I began by ripping out the wires from the on/off switch on the LEDs (above) so that I could instead attach them to my photo diode (light sensor – I’ve been calling it a motion sensor). Using the battery attached to the LEDs, I created a circuit which consisted of my LEDs, my battery and my photo diode as a switch. The LEDs were working at this however, moving my hand in front of the photo diode did cause the lights to turn on and off – but only once or twice before they became permanently stuck in the ON position. I didn’t know why this was – I tried to remove the battery and re-insert it but this didn’t change anything – the lights just remained on regardless of an interaction with the sensor. It seemed that the sensor was just completing the circuit and not acting as a switch – and this was not good enough.

So next i decided to remove the LEDs from their battery and circuit board and attach them to the battery box I bought with the torch last week. I knew that removing the circuit board would eliminate the LEDs ability to either remain static or to flash and therefore I thought that they may now work with the sensor as this is a simpler circuit. No luck – although the LEDs and battery did work.

Image

So I continued to experiment – I am not working with a PIR motion sensor as demonstrated in the instructables recipe that I am following. I found this Photo Diode in a toy at home and thought that if I could get it to work that it would save me money in the long run. Not working with the PIR means that I am kind of working without instructions for the time being while I test this photo diode. So my next plan was to add the on/off switch from the same toy to the circuit (above) because I thought that when I have the switch turned to the ON mode maybe the sensor would work. No luck. The switch successfully turned the lights on and off but still no on/off action from the sensor. So I came to the conclusion that I need a new sensor. This is what I had at the end of my experimentation:

Image

And then something else went wrong just as I went to take the above picture – my LEDs burned out. I don’t know why – the batteries I was using only amounted to a total of 4.5 volts – but they did. I know this because I removed them from the circuit and I  held their wires against the positive and negative sides of the 3V battery they came with and nothing happened. So now I need new LEDs too.

So while I wait for my new parts, I will work with these in the meantime:Image

I have ordered a PIR motion sensor from Scotland and I hope to have it by Wednesday. I plan to also use this tutorial  to help me with this sensor http://www.instructables.com/id/PIR-Motion-Sensor-Tutorial/step2/Lenses/ . While I wait I can be testing the recordable sound module that I found in another toy – because now I know that testing my components is an important task in this Make & Do process.

Make & Do – Progress Blog #3

WP_20131016_005WP_20131016_006WP_20131016_008

I bought a small flash light so that I could take the 9 LEDs out of it. I also wanted the battery box from it so for €4 I kind of got value for my money. These AAA batteries are 1.5 volts each so combined they provide 4.5 volts which I think should be loads to power my components.

I need to find a way to remove the LEDs because they seem pretty stuck into the top of the Flash Light – I’ll probably have to cut it open with a hack saw.

Make & Do – Progress Blog #2

I don’t really want to use a real pumpkin to house my components because I don’t want any moisture to interfere with the workability of my piece.

My original plan was to buy a foam pumpkin and to carve a design out of it. I wanted one of these for two reasons: a) Its dry and b) It’s everlasting. However! When I started to look these up online I was a bit thrown back by the price of them – $40 was the price I’d have to pay for just an average sized pumpkin. I wasn’t prepared to fork out this kid of money for a foam pumpkin – so I was determined to find an alternative.

My next plan was to contact a foam supplier based in Ireland. I was sure that I could buy a block of foam for a reasonably low price and carve my own pumpkin from it. I contacted the supplier:

Image

Again, £51.33 is not a price I’d be willing to  pay for a piece of foam that I would then have to design and carve myself. So this Idea was then scrapped.

I’m now considering some crafty alternatives:

  • Paper Mache – I would cling film over pumpkin and apply multiple layers of paper mache to create a shell. I would then remove this shell by cutting it in half and paper mache it back together. Then I would cut out it’s face and a lid.
  •  I could buy a cheap foam football and carve a pumpkin out of it – although it may end up quite small.
  • I could look into ways of preserving a real pumpkin.
  • I could look into ways of waterproofing my components. Perhaps I could create a case to house my components inside the pumpkin.

I will continue to consider this element of the project while I work on my prototype.

Make & Do – Progress Blog #1

I’ve managed to source, from around my house, a toy which works off of a motion sensor. It uses 2 LR44 button cell batteries so I’ve taken out the sensor, the printed circuit board and the battery holder. I may buy a new battery holder because I snapped the wires off the original one when I was trying to coax it out with a knife – perhaps a 2 x AA battery holder as its cheaper and bigger. I know that 2 LR44 button cell batteries give out 3 volts – the same as 2 AA batteries. I’ll assume for now that 3 volts will be enough to also power the LEDs and the buzzer. The PCB comes with capacitors which I will need if I want to time the the functioning of each of the components – I’m not sure yet how to use them or whether I’ll have to buy new ones but I may get some help from my Dad on that one. I may need to buy a bigger PCB because I’ll be adding wires for my LEDs and also for the Buzzer.Image

I’ve sourced some flashing LEDs from a Road-Safety reflective arm band. I will probably need to buy some more as I want the Pumpkin to really light up. Also, these are red and I would prefer white LEDs – perhaps I’ll use the red ones for the eyes of the pumpkin. For now I’ll use these for trial and error wiring.

WP_20131010_006 WP_20131010_007

I have yet to purchase a buzzer for this project – I’ve been looking online and I think I’ll go with one of these  http://www.amazon.com/RE-Recordable-BUTTON-Sound-Module-seconds/dp/B006NFHLLW  however, I’m worried that the speaker in this is a little too small so I’ll have to look around to see if I can find something a bit bigger. Maybe I’ll find another toy.

For now i will focus on getting the sensor to work with the lights for my first prototype.

Make & Do – This is what I’ve decided to do

In the spirit of Halloween I’ve decided to create an interactive scary Pumpkin!

Image

This idea came to me through a combination of my previous “personal space defender” idea and a toy that my younger sisters used to own – a motion detector eyeball that you can record your voice on and it shouts at you as you walk past.

My plan is to buy a pumpkin, a battery powered motion sensor or perhaps a distance sensor, a custom recordable buzzer and some Flashing LEDs or even chainable Smart Neo Pixel RBG LEDs  for control over multiple LEDs using only one wire.

After connecting all of the components together I will carve out the pumpkin and place them inside.  When someone walks past the pumpkin the motion sensor will complete the circuit and the lights will start flashing along with the sounding of the buzzer – I plan to record something spooky onto the buzzer. I may use a recordable sound module used in greetings cards to record my sound – hopefully it will be loud enough. If not, I will find something louder.

I hope to purchase a foam carvable pumpkin for this project to prevent any of my components from getting wet.

Result: A thoroughly spooked trick-or-treater.